Step by step: How to migrate your AEM environments to AWS

Getting your environments on to AWS
In recent years, migrating to a cloud infrastructure has become a target for many customers who want to get the most out of its capabilities and utilize services which are not available with standard data center solutions.
At first glance, moving your environment to cloud infrastructure can seem like a daunting task. However, with some careful preparation and planning, it can be a smooth transition.
Pre-Migration Preparation
Archive your data: For whatever data you are planning to move onto Amazon Web Services (AWS), you’ll need to decide how that data is going to be transferred. It will most likely be by remote transfer — and for this, you will want to first archive the repository as it improves transfer speeds significantly.
Keep in mind that moving so many files, and subfolders within them, may potentially cause unexpected issues. For example, Apache configuration changes might be needed to serve the many levels of subfolders within the repository. So be sure to archive your data before you start.
Allocate sufficient time: A much safer way to move the repository, in this case, is to group all the files and folders together without compressing them. However, the length of time this process needs should be taken into account as, depending on the system and repository size, it may take up to a day to complete.
Preset the infrastructure: The infrastructure must be planned and set up well in advance of the migration process. This way, it can be properly tested and upgrades can be completed with sufficient time. Instances would need to have configured Adobe Experience Manager (AEM) and the web server, and would require only a repository move, post repository move and small changes after that (i.e. updating passwords and replication agents).
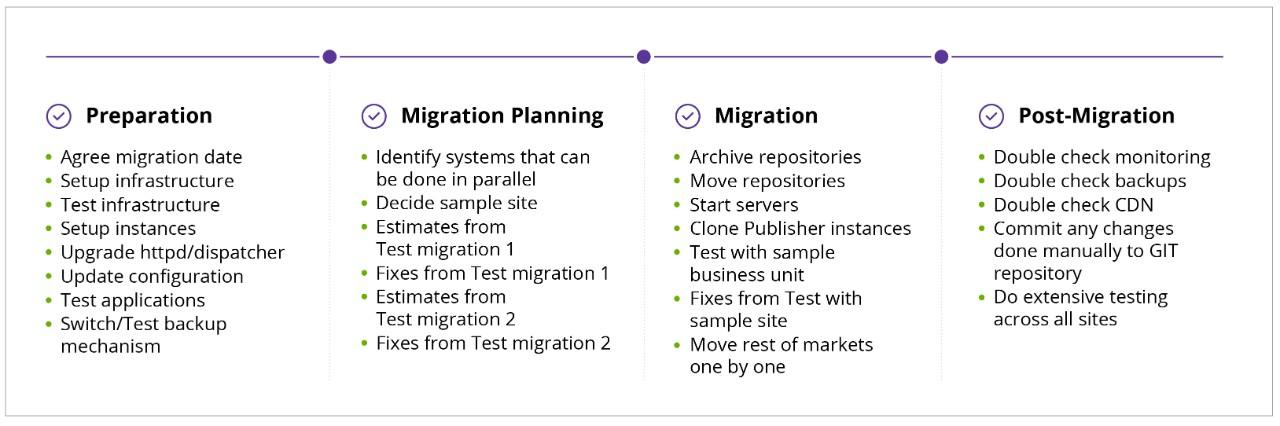
Pre-Migration Planning
Set a schedule: The next thing to plan is which data is moving and when. Identify which tasks can be done in parallel and which tasks can be left until after all the data has been moved.
If there are multiple author instances, a content sharding architecture, they will need to be carried out separately as the content they contain will be completely different. This is because of the amount of data in the content and the number of editors using it. The content will be split into two to relieve the load of author instances.
For the publishing instance, however, it's possible to move one and then clone and configure the rest of the content. This way, it will take less time than moving all the data together, even if the data is moving in parallel.
Freeze the content: During the production system move, a content freeze for editors is a must, otherwise, there is going to be data inconsistency, a loss of data, or — worst-case — a broken repository. This content freeze should be pre-scheduled and all editors notified in advance.
Test migrations: Before proceeding with a production move to a cloud-based solution, it’s important to ensure the process has been tested a couple of times (making sure that all previously existing problems have been resolved each time.) Bear in mind that depending on network speeds and the size of the repository, the move can take quite a while. For this reason, the timing should be estimated during test migrations.
The Migration Process
Note: In case there is no CDN in front of load balancing and the switch needs to be directly on domains. Ensure that both environments are running in parallel and switch as few sites as possible one by one.
How to test a sample: For the testing case, you should have a specific sample site that doesn't have much usage or impact. After switching the Content Delivery Network (CDN), a Q&A should do at least basic functionality testing. The development team should also make sure that all parts of the website(s) are accessible and that the servlets are working as expected.
Sample testing issues: If you have any issues with the sample site during the test run, make sure to switch back the CDN and do a debugging by spoofing the domain to prevent Google or any other search engines from indexing the wrong content.
Manual updates: Any changes that are done manually to remedy encountered issues should be applied across the whole environment manually and later updated to the Git repository. After they are updated to the Git repository, they should first be tested on the integration environment before being moved to production. Any risk caused by upgrading automatically from the Git repository leaves you open to spending a lot more effort fixing issues that have already been resolved manually.

Post-Migration Checks
The CDN switch: Only when all issues are fixed, should you do the switch on the CDN side for the sample site, testing it again to see if the issue is still present. Each CDN switch might take from 10-30 minutes to be applied, but be sure to plan the CDN switches in at least 3-5 parts.
Depending on the number of splits, it can take a significant amount of time, and this should be factored in.
Why split it: The split in the CDN switch lets the systems load incrementally instead of a hard drop. It also allows some cache to be built-in while the migration is happening. This leaves your team some time to tackle any issues that arise during each switch, before proceeding to the next one.
Tips and Tricks for an Easier Switch
Classic Load Balancer versus ALB
Switching from a Classic Load Balancer to an Application Load Balancer (ALB) is highly advised as it enables a lot of possibilities.
For example, one ALB can hold multiple certificates, so you can support multiple domains. An ALB can also have different target groups based on the hostname, which allows you to use the same load balancer to handle multiple interactions. For example, 80/443 ports are open for web access and some other ports are open for deployments of target groups based on the hostname.
The Application Load Balancer has deletion protection and, in the case of debugging, you can do a request tracking.
Have One Big /opt volume
Having separate volumes for /opt is a good way to ensure mission-critical apps are all in one place, including the configuration files for easier snapshots. This also helps during the migration, when you have to move repositories from external sources and more space is needed.
Time to Update
If you’re moving from a classic datacenter to an AWS-based solution, then it’s also a good time to upgrade your Apache and the Dispatcher if the project is behind. Depending on the version you are migrating from and to, configuration changes will need to be completed. However, those changes are basically just splits in configuration files that will bring more organization to those files, as well as to your Dispatcher rule sets.
During the configuration file split, you need to ensure that the configuration is updated in terms of security and that it allows access to public components. New security features are being added to the Dispatcher, so it is also a good time to plan a dispatcher rule review to update the security on there.
Tools to simplify the migration process and management
Apply server: Using the apply server, you can enable your setup to be much more automated. In some cases, you might not have the luxury of using a fully-fledged configuration management system like Puppet or Chef, and there may be a need for something more flexible with regards to releases and deployments. With the apply server, you don't need that flexibility. It is a tiny tool that can be put into place and whose specific actions you can control. This makes use of HTTP/S and no longer requires SSH access.
There are other tools from which you can perform similar actions for executing SSH commands via http/s but none are as simple and fit for purpose as the apply server.
There are many options for starting an HTTP server already [1,2], but none that focus on:
- running scripts on a target system (and make the resulting history visible),
- uploading/downloading files to/from a target directory in zip/tgz format (zipping/unzipping on the fly),
- having minimal dependencies. Apply server is a lightweight fat jar and has only a JRE as dependency.
Shell2http: Shell2http is a tool that allows you to configure specific commands on a specific host. In practice, we use it to allow people to clear the cache on host machines via URL without giving them access to the machine console. This allows us to configure additional terminal commands that can be used on the machine if necessary.
Puppet (configuration management): We utilize Puppet as our main configuration management tool across our projects. Puppet has a repository in Git that is split depending on the project; based on the machine hostname it detects the environment and role.
Based on the information defined, it deploys and maintains configuration files and installed packages across all projects, environments, and roles. It also helps us to deploy configuration across environments or roles just by committing code to the Puppet Git repository.
Git (version control): Git is our main distributed version control system, which we utilize for maintaining application configuration files and application code within it. We utilize Jenkins to build application packages (that are maintained by Puppet on the machines), which also includes application configuration files.
Jenkins (ci/cd): As Puppet maintains only machine configuration files, the packages built by Jenkins have application configuration files included in them as well. The application configuration files are split by environments and roles to ensure we apply the correct configuration to the correct machine.
Jenkins is used for automatic deployments across projects where it is technically possible to implement it.
Nexus (software repository): Developers upload created packages for deployment to Nexus, the package repository manager. Jenkins then takes the package or packages from Nexus and uploads them to a target machine where it triggers their installation.
Terraform: It enables users to define and provision a datacenter infrastructure using a high-level configuration language known as Hashicorp Configuration Language, or optionally JSON.