JUnit 5: leveraging new features for testing

A large number of developers regularly work with JUnit, mockito as well as Sling/OSGi Mocks. However, many are missing an opportunity to leverage the advanced and updated features of JUnit 5. Whether you’re ready to emigrate from JUnit 4 to 5 or not, here’s a deep dive into the new features the redesigned JUnit 5 can bring to testing in a variety of projects.
JUnit 5: new features and key updates
Let's go through the nice features that junit 5 offers us. At least some of them you be interesting to you and can trigger the change to the new version.
Precise exception handling
One of the key issues many developers experienced with JUnit 4 was with precise exception and timeout handling. For example, if you’re running a big test with a lot of boilerplating (class instantiation, mock preparation, etc.), you might want to test whether there’s an exact point of exception. In JUnit 5, the new AssertThrows method allows you to specify the part of the code you want to verify, meaning the exception should be thrown by the code isolated in the lambda function. This allows you to test the exact point where an exception should be thrown.
Example:
@Test
 void shouldThrowException() {
     …
    //parse should throw IllegalArgumentException
    assertThrows(IllegalArgumentException.class, () -> {
    parser.parse()
    })
 }
Similarly, you can also test if a part of the code is run before a given timeout is exceeded.
 @Test
 void testTimeout() {
    …
    // underTest.longRunningOperation should run in less than 500 milliseconds
 assertTimeout(Duration.ofMillis(500), () -> {
        underTest.longRunningOperation()
    });
 }
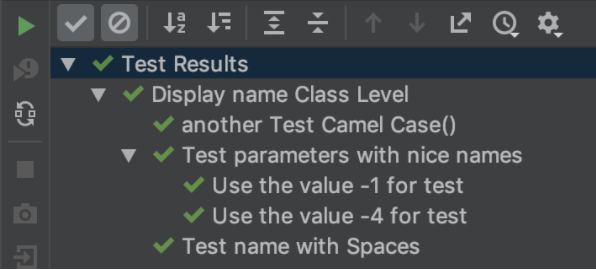
Friendly display names
Another useful feature introduced in JUnit 5 allows you to use display names in your test using @DisplayName.
@DisplayName("Display name Class Level")
@DisplayNameGeneration(ReplaceCamelCase.class)
class DisplayNameDemo {
    @Test
    void anotherTestCamelCase() {
    }

    @DisplayName("Test parameters with nice names")
    @ParameterizedTest(name = "Use the value {0} for test")
    @ValueSource(ints = { -1, -4 })
    void isValidYear(int number) {
        assertTrue(number < 0);
    }
 @Test
    @DisplayName("Test name with Spaces")
    void testNameCanContainSpaces() {
    }
}
ReplaceCamelCase class puts a space in the method name if no displayName property is set. So you have a nice output in your IDE:
Group assertions
In AEM, usually, we want to test if all properties of a given component are correctly set. With "group assertions" you can have just one failure which shows all the failed asserts.
@Test
void testNodeProperties() {
    ValueMap valueMap = getValueMapOfResource();

    assertAll("Component Properties Check",
            () -> assertEquals("value1", valueMap.get("prop1", "not_set")),
            () -> assertEquals("value2", valueMap.get("prop2", "not_set")),
            () -> assertEquals("value3", valueMap.get("prop3", "not_set"))
    );
}
So, thanks to the new group assertions feature in JUnit 5, you can test all the properties of your component at once, meaning just one collective fail is possible.

Dependency injection
Another useful addition in JUnit 5 is the @ExtendWith feature which prioritizes extension points over features. Extension points enable more functionalities in your tests. Examples of extension points are SlingContextExtension or MockitoExtension.
@ExtendWith(SlingContextExtension.class)
class DependencyInjectionTest {
    private final SlingContext context = new SlingContext();

    @BeforeEach
    void setUp() {
        context.load().json(JSON_PATH, DEST_PATH);
    }

    @Test
    void testDependencies(TestInfo testInfo) {
        Resource resource = context.resourceResolver().getResource(DEST_PATH);
        assertNotNull(resource, "Resource null in " + testInfo.getDisplayName());
    }
}
Conditional tests
If you need to run different sets of tests in multiple environments, the conditional tests feature is extremely valuable. For example, if you’re testing on mac only, you could use @EnabledOnOs. Alternatively, you can specify your test using @DisabledifSystemProperty or @EnabledIfEnvironmentVariable, these two annotations allow you to disable or enable a test based on a system property or an environment variable.
@Test
@Disabled
void neverRun() {...}

@Test
@EnabledOnOs({ OS.LINUX, OS.MAC })
void runOnSpecificOS() {...}

@Test
@DisabledIfSystemProperty(named = "ci-server", matches = "true")
void notOnCiServer() {...}

@Test
@EnabledIfEnvironmentVariable(named = "ENV", matches = "test-env")
void onlyOnTestServer() {...}
As you can see, in JUnit5, @Disabled replaces our old friend @Ignore
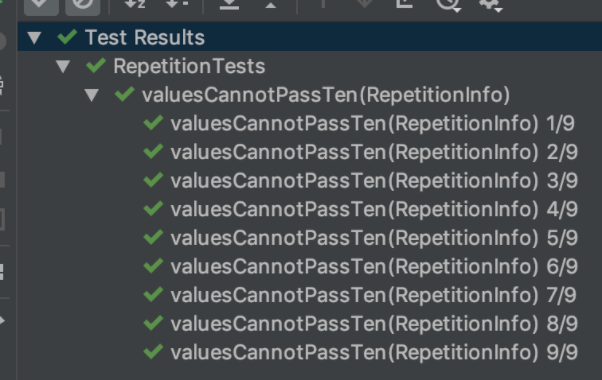
Repeated tests
It is common on AEM to have a component which has several child components. If you want to test each of these child components, we have to repeat tests a number of times or create a loop. However, JUnit 5 provides a way around this thanks to the new @RepeatedTest feature. Another good example of use is if you want to test how your code behaves in a certain range of entries like the example below:
@RepeatedTest(
value = 9,
name = "{displayName}-{currentRepetition}/{totalRepetitions}")
void valuesCannotPassTen(RepetitionInfo info) {
    assertTrue(info.getCurrentRepetition() < 10);
}
Parameterized tests
If repeated tests aren’t sufficient for your needs, another feature provides a unit test method that allows you to run tests multiple times with different input values in each case. Parameterized tests were a feature in JUnit 4 but they’ve been updated to increase usability in JUnit 5, allowing you to select sources to send parameter values. Several inputs are allowed, for example you can use @CSVSource to enable your test with comma separated values.
@ParameterizedTest(name = "Test fruit \"{0}\" with rank {1}")
@CsvSource({
        "apple,         1",
        "banana,        2",
        "'lemon, lime', 3"
})
void testWithCsvSource(String fruit, int rank) {
    assertNotNull(fruit);
    assertNotEquals(0, rank);
}
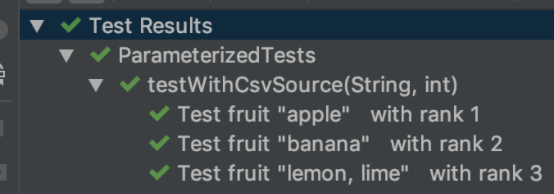
Possible sources are: @ValueSource, @EnumSource, @MethodSource or @CsvSource
Dynamic tests
Dynamic tests were introduced in the version 5.4 of JUnit. They allow you to create a set of tests that run via @TestFactory. Using this feature, you can select a stream of dynamic tests, or an array of tests, and then run them dynamically. This is a great feature to create libraries of tests, that also makes your code easier to reuse and offers more flexibility than parameters.
Map<String, String> testMap = new HashMap<String, String>(){{
    put("Palindrome 3 letters", "mom");
    put("Palindrome 5 letters", "radar");
    put("Palindrome 6 letters", "redder");
}};

@TestFactory
Stream<DynamicTest> dynamicTestsFromStream() {
    return testMap.keySet().stream()
            .map(key -> dynamicTest(key, () -> {
                        String word = testMap.get(key);
                        assertTrue(isPalindrome(word));
                 });
}
The output is

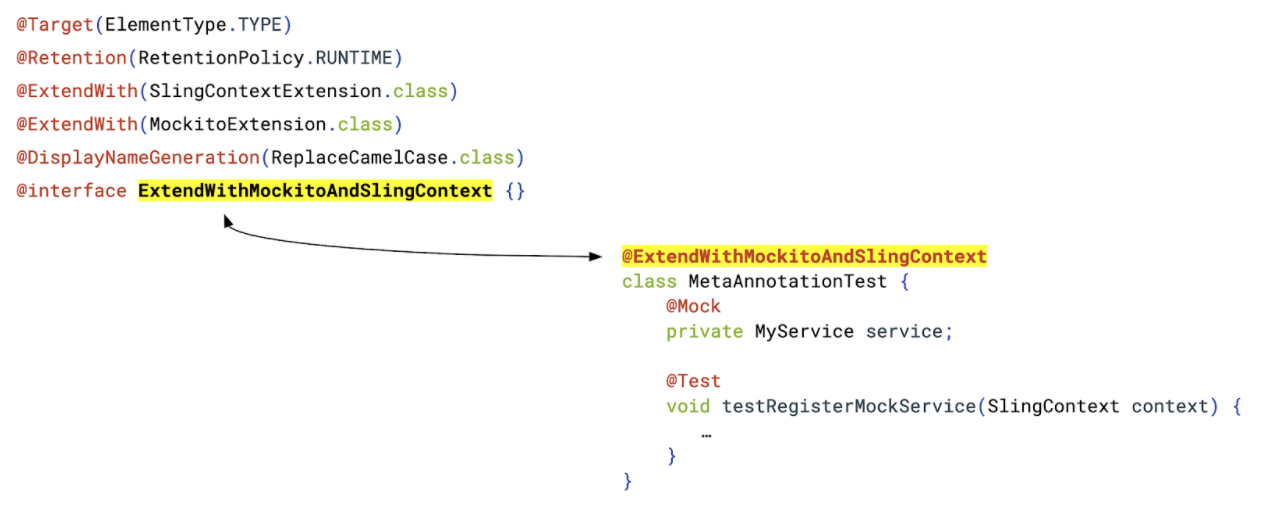
Meta annotations
Another issue with JUnit is that it’s highly verbose. To save time, using JUnit 5 you can create your own annotation so that you can keep your code clean. Let's see one example to understand it:
More JUnit 5 features
Those mentioned above are just a few of the innovative new features of JUnit 5. However, there are many more benefits to be enjoyed when leveraging it. Some further features to consider are:
- Parallel tests. Though still an experimental feature, this allows you to calculate the CPUs you have, how far your tests can be parallelized, and then run the tests too.
- Un-public. In JUnit 5, there’s no need to make everything public.
- Lambda. in JUnit 5, you can add Lambda support, adding visibility and reducing your code.
- 3rd party integration.
- Nested test classes.
- IDEs and tools support.
You can see all features in https://junit.org/junit5/docs/current/user-guide/
How has this been achieved?
It’s thanks to a complete architectural overhaul and rethink of the monolithic principles of JUnit 4 that so many updates and new features have been possible. JUnit 5 makes use of modular architecture, as can be seen in the diagram below:

JUnit 5 also follows three key architecture principles:
- It provides extension points over features.
- It has extensibility in mind.
- It’s backward compatible.
Within this architecture, the JUnit tool (API) and the JUnit platform are clearly separated. Where you run your tests and how you code them are distinct, meaning that you have your tools on one hand, and the platform that knows how to run tests on the other.
Migrating to JUnit 5 from JUnit 4
To get started on JUnit 5 you’ll need to add BOM dependency, with all your dependents inside it, to your principal POM file. In order to ensure backward compatibility with JUnit 4 whilst emigrating, add the JUnit Vintage engine to work with both simultaneously. Many believe the migration process will be time-consuming, however, in our experience, it took 6 hours to migrate around 300 tests which were up and running in no time.
There’s a world of testing possibilities to be explored using the power of JUnit 5. At Netcentric, we’ve helped some of the world’s greatest brands by unlocking this advanced testing technology. Get in touch today to discover how you could be leveraging JUnit 5’s cutting-edge new features.